Showing posts with label japan. Show all posts

Friday, 18 November 2016

Fan-tasty: Poke-rice-balls

"I wanna be the very best, like no one ever was."

This signalled the beginning of what was to become such a big part of my childhood. Pocket Monsters, or as it's more widely known as Pokemon, recently celebrated it's 20th anniversary of the release of the original games, Red, Green and Blue on the Game Boy. In those twenty years, it's become a globally popular franchise that spans video games, comics/manga, animated movies and television shows, trading cards and toys, and most recently, a mobile augmented reality game, Pokemon Go. Now up to the seventh generation of Pokemon, the newest games, Pokemon Sun and Pokemon Moon are set to release 18th November.

My hype is real. Thank you to my friends for putting up with my excitement in this week lead up. Also I am fully aware there's an accent over the 'e' in Pokemon. Humour me and pretend there's an accent every time I mention something Pokemon related. (source)

(Also on a somewhat related note, in the past few weeks, Nintendo released some details about it's upcoming console (the Nintendo Switch) which should be pretty interesting.)

Quick run-down of how the Pokemon games work if you're in the proportion of the population that've never played Pokemon before. Basically, you travel the region collecting Pokemon and battling other Pokemon trainers in-game and via the online system. There's many different ways of approaching the game, and people have devoted hours upon hours working out the best strategies to beat the game.

Of all the items available in the game, probably the most well known of them is the iconic Poke Ball which is used for housing your Pokemon team. In later generations, items based on food were added: Berries, which could be blended together to make PokeBlocks and later, Poffins; Lava Cookies which resemble rice crackers; Apricorns which were used to make specific Poke Balls depending on their colour; and Poke Puffs which are a recent addition to the series.
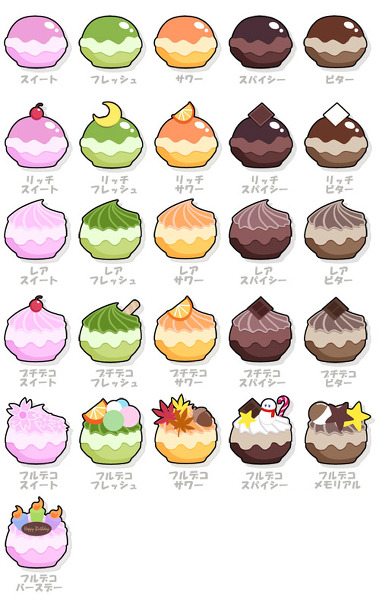
It's one of my dreams to make every one of these Poke Puffs(source)

Crossing over to reality, there are many examples of food inspired by Pokemon (the ones that come to mind are charaben or character bento, often elaborately designed boxed lunches to resemble people or pop-culture icons; a series of cocktails you can find here, or at one Sydney cafe which, for a limited time, had Pokemon burgers here). I decided to take a page out of the bento book and go with a staple: the humble rice ball or onigiri.

I'll save my ode to rice for a later post, but basically rice can be classified into three broad categories: long, medium and short. This particular recipe uses medium grain rice, because the stickiness of the grains allow for easier shaping and less chance your rice ball will fall to pieces. I used a spherical ice mould that I picked up at a shop some time ago, but I think you can easily get the same result by using a bit of cling wrap and shaping the rice into a ball. Just separate your cooked medium grain rice into two portions, one to be coloured and one to be left plain. Form a rough handful of each into a hemisphere (try to keep them even) and ta-dah, you've got two halves of a ball.

Very complex stuff, this.

I'm fascinated by differently shaped ice cubes. I've also got a tray that'll give the ice cube a jewel-like faceted finish. I'm planning to use it to make fancy looking desserts. 

As for the colour, you can change the colour of the rice by natural or artificial means; from using a few drops of food colouring, to mixing in different coloured ingredients, or by using different varieties of rice which have different colours. In this case I used some tomato sauce to get the red colour and add a bit of flavour, but traditionally, rice balls were only flavoured with salt.

I also decided to be fancy and add some filling (tuna and mayo) but really, anything that strikes your fancy can go in these. Some other ideas for fillings might include pickled vegetables, thinly sliced omelette, or even last night's stir fry (if diced finely enough). If you're adding filling, make a small divot in one half of the Poke Ball and gently pack it in. Don't apply too much pressure when adding the filling otherwise your bottom half might disintegrate. Pop the other half in top, and if using cling wrap, wrap it around and twist the excess to make a tight ball. You're almost done!

I was actually very heavy handed with the tomato sauce (or ketchup for all you readers across the ocean) so my rice balls turned out very tomato-ey. 

And the other half, not as packed tightly as it should've been. 

Fun fact, I had a bit of difficulty removing them from the moulds because in my infinite wisdom, I forgot to grease the tray. Don't despair, because you can easily fix it by gently shaping the ball in your hands. 

The decorations are made with seaweed sheets, or nori, while the white bits were cut from a slice of cheese; mayonnaise completed the picture as the glue holding all the pieces together. I've considered getting a scalpel for more fiddly cut-outs, but a pair of scissors will hold you in good stead here. Just make sure they're clean before using them, and not covered in sticky tape residue and wrapping paper slivers from last-minute gift preparation (as of the writing of this entry, there are SIX more Sundays until Christmas, where did this year go?!)

Cut a roughly 1 cm thick strip of seaweed, a circle of seaweed, and a circle of cheese that's a little bit smaller than the seaweed circle. I cut them freehand with a paring knife, but if you're not the most confident with your knife skills, you can use something as a template. The strip will wrap around the circumference of the ball and hide the join of the two rice halves, so don't worry if it's not the prettiest. The seaweed circle goes on first with either a dab of water or mayo, and then the cheese goes on top of that, fixed in place with mayo. And that's it! A round of applause and pats on the back for everyone, you're now the proud owner of Poke Rice Balls. Bonus points if you eat these while playing Pokemon Go.

As easy as 1,2,3

There are 3 Pokemon here, which will you choose...?


Happy slothing!!
xx


Thursday, 11 December 2014

Ghibli Week 1: Profitotoroles

Let's get this week kicked off! Today we visit the towering trees of Japan to seek out a friendly neighbour...have you guessed it yet? It's となりのトトロ (My Neighbour Totoro) time!! This is arguably the most well known of all Hayao Miyazaki's work, and Totoro himself is part of the Studio Ghibli logo and as well known in Japan as Winnie-the-Pooh is to the UK. My Neighbour Totoro was released in 1988 and it's dazzled adults and children alike since then. It's one of my favourite movies, and I'm not afraid to admit I've got a Totoro plush in my room. 


(source) aaaaah he's so cute 

Something I've always been fascinated by is food art, and you'd be hard pressed to find a country that does it better than Japan. So is it any wonder that they've even made profiteroles or cream puffs in the shape of Totoro? This place is the only officially recognised seller of Totoro cream puffs so you know they're good. It's one of the places that I want to see when I eventually visit Japan, but for now you can read more about them here! 

Now these are something I've made before, but I decided to try and imitate the store's puffs. Overall with this recipe...I think I could've done better presentation wise. It's one of those where the equipment you use really has an impact on the quality of the finished product, so I think there'll be some piping bags in my near future. However taste wise: it's crisp but not buttery, and even a day old, they're not soggy so that's a plus in my book. Warning: go no further if you can't stomach a beloved character being consumed.

Crazy eyes. They know what's coming.
Admittedly this one's a bit dark. Sorry kids!

Now this recipe calls for choux pastry, which can be quite daunting to make. Practice makes perfect and once you get the hang of it, you'll be whipping out profiteroles and eclairs like no one's business. At first glance, the recipe is simple (famous last words). Butter and water in a pan, stir in flour then add eggs. Okay, so what could go wrong? One, your flour could burn, rendering the entire thing useless. Two, your flour mixture could be too hot and actually cook your eggs, resulting in some kind of scrambled disaster. Three, and this one's the most common, your profiteroles don't rise. In perspective, this isn't a big deal because you can plump them up with whatever filling you like, but there's something incredibly disappointing when you look at those flat pastry pancakes instead of golden mounds of joy.

Quick science lesson! (Disclaimer: I am not a food scientist nor have I ever studied food science; everything I've learnt is from reading recipes til my eyes cross, watching cooking shows and internet. So much internet.) I've touched on this before in my previous post about the scones, so it's kind of the same principle. The crust traps the steam which is formed when the water evaporates, resulting in the characteristic puff appearance. Okay, science over.

So solutions: number one, keep an eye on the roux (the flour and butter mix) and use a low heat; number two, make sure you cool the mixture down. A bit vague, I know, but my go-to standard is body temperature (so you can touch it without it burning you). Thirdly, add the egg little by little, don't dump it all in at once. Try not to add more than maybe two tablespoons at a time, and make sure the mixture is beaten really well before adding more egg. Fourthly, preheat your oven really well  for at least 15-20 minutes before you plan to put them in. You can also make them crispier by lowering the heat, slitting them open with a sharp knife (be careful of the steam!) and baking them for a bit longer which will help to dry out the insides.

Mmm delicious watery butter
Off the heat immediately and chuck the flour in and beat it, beat it, beat it. 
You get killer arm muscles.
Adding the egg bit by bit, looks ridiculous
But gradually...
It becomes great.
Boom. Choux pastry. #winning
When it comes to the making of, you can be fancy and do it almost like a pear like shape so he gets a head and body, but I was having enough difficulty squeezing it out from the plastic bag onto the greased paper to bother with that. I went with the vague oval approach for the bodies, then with the remaining dough in another bag, I piped a little 'u'-ish shape for the ears. So this is a really dumb story and I probably shouldn't be telling you this but I tried using baking paper for the pastry bag, which usually works for things. Looking back, I probably folded it wrong but live and learn! Anyway, I made this cone shape thing, then realised I had no way of keeping it closed; so at first I used sticky tape. Didn't work because, well, it's baking paper. Then I decided to staple it shut. It looked legit, so I was like yeah, this'll work. It didn't.

My cone of shame
Using a freezer bag, you've got pretty much no control where your puffs go hence the terrible use of space.
Not the nicest I've ever made.
Dampen your finger with water and squash them into submission.
Decoration wise, go nuts. Easiest way is probably going to the shops and getting pre-made icing eyes (I'm pretty sure they exist) or alternatively get those icing pens from the supermarket and draw on faces. If you've got a bit of time to spare, you can also make them out of white chocolate and dark chocolate or Nutella for the details. I melted down some white chocolate blocks and piped them into circular shapes and put them into the fridge, then when they were hardened, got some Nutella on a toothpick and drew in pupils. Back into the fridge until I needed to use them, then drew on the nose with Nutella and melted the back of the white chocolate eye with a fingertip. I've got really warm hands though, so it might be easier to use a knife that's been sitting in hot water and is wiped dry before using. I filled them with a mixture of custard and cream from their base, then sat them in a cupcake liner, but presentation's completely up to you!

If you have any that aren't up to scratch, eat them.
Look at that lopsided Totoro. He's just accepted his fate.

Related Posts Plugin for WordPress, Blogger...